
Invoice corporate/debtor accounts
Invoice corporate/debtor accounts
Generating Invoices
- To Issue an Invoice to a Company / Debtor as a Form of Payment This can be done at the time of making the Original Booking.
- Note you can only invoice from a Booking linked to corporate account
- The booking must first be linked to a Debtor at the bottom of the CLIENT DETAILS screen.
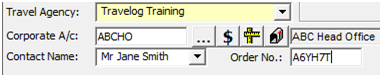
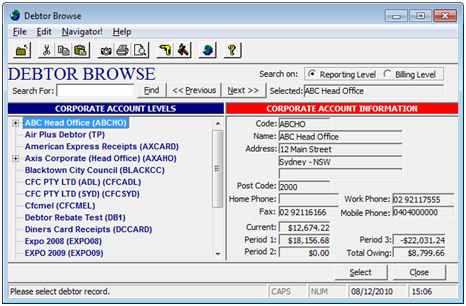
- Press the BROWSE BUTTON adjacent to CORPORATE A/C to access the DEBTOR BROWSE screen. This will allow you to SELECT the relevant Debtor and press Select Tab.
- The debtor code fills in at CORPORATE A/C.
- Select CONTACT NAME from the drop down list or fill in. Fill in ORDER NUMBER if used.
- Fill in ORDER NUMBER if used – NOTE: Order numbers are sometimes referred to as COST CENTRES or PURCHASE ORDER numbers


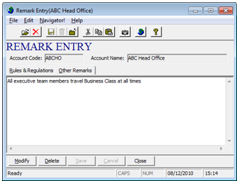
- Check and/or enter PAYMENT DETAILS, RULES AND REGULATIONS & DEBTOR ADDRESS DETAILS, which are essentially the same as those used with the client profile, except that they are used to record details about the Debtor.


- Complete related TRIP INFORMATION and Create As booking. (Section 3 – Trip Information)
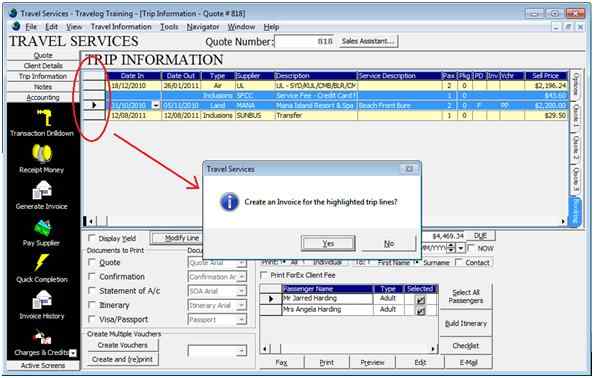
- Under your ACCOUNTING list bar, click on GENERATE INVOICE. This is for a situation where all the booked lines for a particular passenger will be invoiced to the corporate, with no part having been paid privately – alternatively select individual lines to be invoiced then click on GENERATE INVOICE (See Invoicing only PART of a Booking)
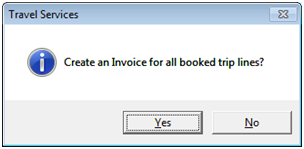
- Answer YES to question
- The INVOICE PASSENGER SELECTION window appears.
- Place a tick in the BOX IN SELECTED column next to the TYPE OF passenger(s) to be included on the invoice.
Those passengers not ticked are either linked to the profile, but not travelling on this booking or they are part of the booking paying separately.
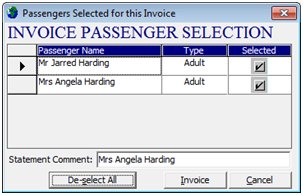
- Click Select All Passengers button
- In STATEMENT COMMENT Users can change small comment to appear in the Debtor
- Statement in relation to this invoice.
- Press INVOICE.
- NEW ADDRESS enables the selection of another address from up to six possible choices set up by the system administrators in the Debtor Maintenance area.
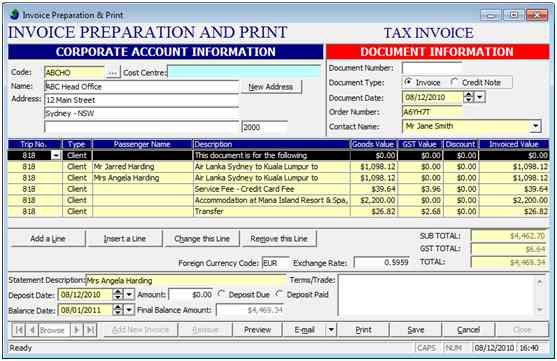
- COST CENTRE enables linking of a head office to a sub-branch.
- If the invoice is for an initial deposit, or a deposit has already been paid, press DEPOSIT DUE or DEPOSIT PAID as appropriate, fill in AMOUNT and DEPOSIT DATE & BALANCE DATE.
- DOCUMENT NUMBER is generated automatically, and the comment in TERMS & TRADE fills in from the Back Office set-up. Free text remarks can also be added in this space.
An Invoice can be customised further by using the ADD, INSERT, CHANGE or REMOVE LINE button(s). All invoices generated in Travel Services can be E-mailed to your clients using the Email button next to the PRINT and SAVE Buttons. You can also send Invoices via e-mail in PDF Format from the back office after previewing the Invoice/Credit Note on- screen
- CHANGE A LINE. This enables access to the INVOICE DETAIL LINE ENTRY screen.
(NOTE: you must first highlight the line to change by clicking anywhere on the line first.)
- Clicking the down arrow on the highlighted invoice line also opens the details of the Invoice line entry.

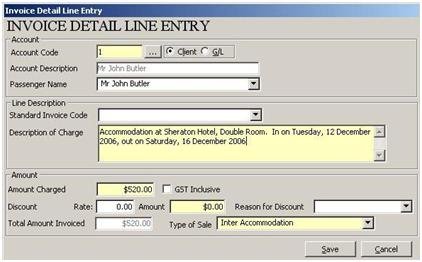
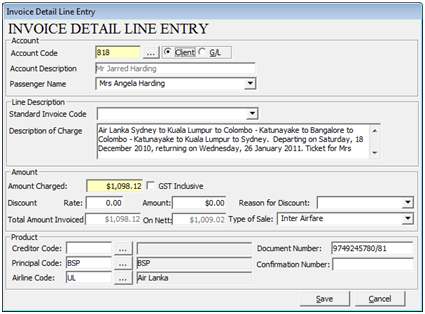
- DESCRIPTION OF CHARGE is sourced from the Trip Lines and shown in full. This is how it will print on the invoice however this area can be edited using free text.
- A standard comment can be entered in STANDARD INVOICE CODE by choosing from the selection in the drop-down list. This will then appear in DESCRIPTION OF CHARGE. This can be set up to appear at the beginning, middle or end of free-format invoice data. Otherwise, free text alone can be used in this area.
- Fill in AMOUNT CHARGED, etc as required. This will be added to the invoiced total.
- SAVE
- GST – is mandatory, and would need to be ticked or un-ticked if GST applies.
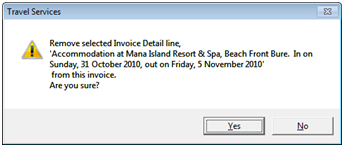
- Pressing REMOVE A LINE not only removes the highlighted line on the invoice, but deducts the invoiced value of the deleted line from the invoice total
- INSERT A LINE allows insertion of a line above the line highlighted in black
Invoice Line entries can also be arranged in any sequence the same way as re-ordering itineraries.
- Click Print for a hard copy of the invoice and the word “Printed” will appear in top right hand corner
NOTE: Only one 'Tax' Invoice can be printed from Travel Services and all other printed copies will read ‘Copy’ Invoice. To print additional ‘copies’ you must go to the Invoice History Icon and print from the copy that appears. A ‘Tax Invoice’ can only be printed again by a system ‘Administrator’ from the Back Office ‘Invoice Preparation and Print’ window.
Invoicing only part of a booking
- Under TRIP INFORMATION highlight the lines to be included on invoice using the Control Button on your keyboard until each selected line turns Blue (Hold the Ctrl key down and click on the left hand grey section of each line selected)
- In the Accounting LIST BAR, Click on GNERATE INVOICE
- Answer YES if you are satisfied when asked that all lines for invoicing have been selected.
Please review additional questions the System may prompt you with as Travelog will take into Account any amounts previously receipted to your Travel Services Trip Number. The amounts can then be deducted form any Invoices created
- Fill in INVOICE PASSENGER SELECTION as in the previous example, and continue as per details contained in the GENERATE INVOICE section of this manual.
Copyright © 2017 - Travelog Pty. Ltd. ABN: 67 099 078 985